Capturing Peak Moments: Better Mountain Photography for Lasting Memories
You’re heading into the mountains, eager to soak in the majesty and create memories. This guide will walk you through the practical steps to dramatically improve your mountain photography, ensuring those incredible vistas and fleeting moments translate into images you’ll cherish. We’ll cover everything from smart gear choices to mastering tricky alpine light, helping you tell a compelling visual story without needing a professional studio or endless technical jargon. Understanding these techniques isn’t just about better photos; it’s about capturing the true essence of your mountain experiences, creating keepsakes that transport you back to the crisp air and expansive views long after your trip concludes. You’ll learn how to approach mountain scenes with confidence, producing photographs that truly resonate and capture the unique spirit of high-altitude adventure.
What Gear Do You Really Need for Stunning Mountain Shots?
Forget the notion that you need the latest, most expensive camera to get great mountain photos. While top-tier equipment can offer certain advantages, a solid understanding of fundamentals often matters more. The best camera, after all, is the one you have with you. Many modern smartphones boast incredible capabilities, especially with computational photography, making them perfectly viable for capturing breathtaking scenes. That said, if you’re looking to step up your game, a mirrorless or DSLR camera offers greater control over exposure, depth of field, and image quality. These cameras give you the flexibility to change lenses, manually adjust settings, and capture more detail in challenging conditions.
When considering lenses, a wide-angle lens (like a 16-35mm on a full-frame sensor or its equivalent on a crop sensor) is your friend for expansive landscapes, allowing you to capture the grandeur of sweeping mountain ranges. It emphasizes perspective and makes distant objects appear smaller, enhancing the sense of vastness. A telephoto lens (70-200mm or longer) can compress perspective, making elements appear closer together and isolating distant peaks or capturing wildlife that might otherwise be invisible. You don’t need both for every trip; consider what kind of shots you envision. For example, if you’re focused on grand vistas, a wide-angle might be sufficient. If wildlife or distant details are your priority, pack the telephoto. A versatile mid-range zoom (e.g., 24-70mm) can also be a great all-rounder if you prefer to carry less.
Beyond the camera body and lenses, a few accessories make a world of difference. A lightweight yet sturdy tripod is invaluable for sharp images in low light, for long exposures (think silky waterfalls or dramatic star trails), and for precise compositions. Investing in a compact carbon fiber model will significantly reduce your pack weight—a major consideration when hiking. Filters, particularly a circular polarizer (CPL) and neutral density (ND) filters, can drastically improve your images. A CPL reduces glare from water and wet rocks, deepens blue skies, and enhances green foliage, making colors pop without over-saturation. Graduated ND filters are particularly useful for balancing bright skies with darker foregrounds, preventing blown-out highlights or underexposed shadows in a single shot. Always carry extra batteries—cold mountain air drains them much faster than you’d expect—and plenty of memory cards. Finally, protect your gear! A waterproof and dustproof camera bag, along with lens cleaning cloths and a blower brush, are non-negotiable for unpredictable mountain environments. Every ounce counts when you're trekking, so be selective about what you bring. You want gear that complements your adventure, not hinders it, and that you’ll actually use.
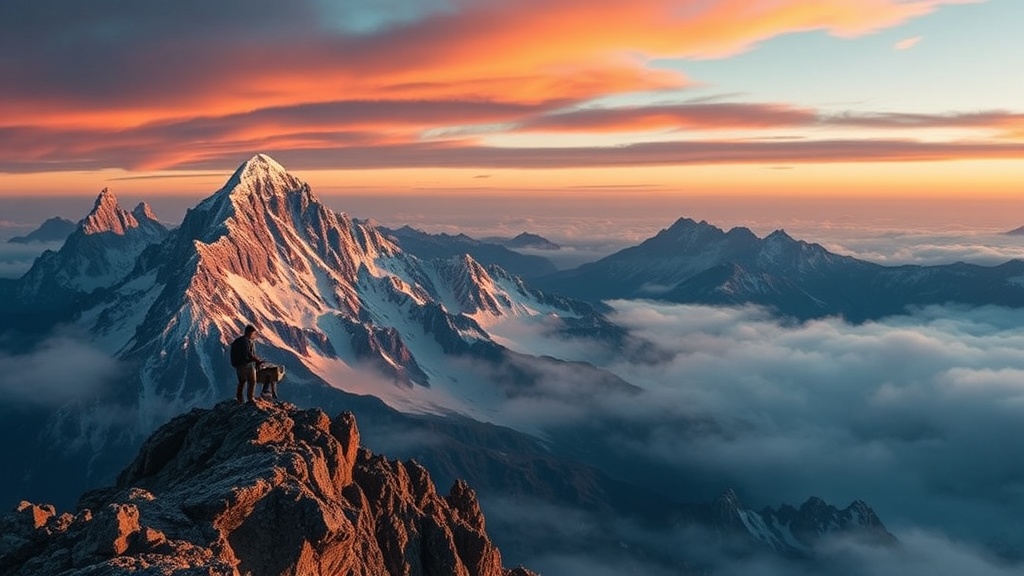
How Do You Handle the Unique Light and Weather in High Altitudes?
Mountain light is a fickle beast, constantly shifting and presenting unique challenges and opportunities. Understanding how to work with it is paramount to great photography. The "golden hour"—the period shortly after sunrise and before sunset—casts a warm, soft, directional light that beautifully illuminates textures and contours, making mountains glow with incredible dimension. This low-angle light adds a depth and richness that’s hard to replicate. The "blue hour," just before sunrise or after sunset, offers a cooler, softer ambiance, perfect for serene, moody scenes, particularly when artificial lights in a mountain town begin to twinkle. Aim to shoot during these times whenever possible; waking up early or staying out late truly makes a difference in the quality of light you capture.
Midday sun, while bright, can be incredibly harsh, creating strong, unflattering contrasts, deep shadows, and flat-looking landscapes. If you must shoot at midday, seek shade, use a diffuser if you're close to a subject, or focus on details and abstract compositions rather than expansive scenes. Shooting directly into the sun during sunrise or sunset can create dramatic silhouettes or beautiful sunbursts if you use a narrow aperture (like f/16 or f/22) and compose carefully. Overcast days, surprisingly, can be excellent for photography. The clouds act as a giant softbox, providing even, diffused light that’s perfect for forests, wildflowers, and waterfalls, minimizing harsh shadows and preserving detail across your entire frame. This consistent light simplifies exposure and allows colors to shine without interruption.
Mountain weather, however, is rarely cooperative for long. Fog, mist, and dramatic clouds can transform a familiar scene into something ethereal and captivating. Don’t pack away your camera when the weather turns; instead, embrace it. A sudden storm rolling in can create incredibly dynamic skies and add raw drama to your compositions. Just be sure to protect your camera from rain or snow with appropriate covers—a simple plastic bag can even work in a pinch. Capturing light rays piercing through clouds (crepuscular rays) or a vivid rainbow after a shower are moments that define truly memorable mountain photography. When shooting in snow, remember that your camera's meter can be tricked by all the bright white; you often need to overexpose by about 1 to 2 stops to ensure the snow appears white, not grey. Always keep an eye on the forecast, but be ready to adapt and find beauty in whatever conditions the mountains present. For more detailed information on mountain weather patterns and forecasting, check out resources like the